Cryptomining has surged in popularity, driven by the growing value of cryptocurrencies like Bitcoin and Ethereum. With leaked credentials easier than ever to acquire, attackers are looking for ways to profit, which has led to a rise in malicious cryptomining, or cryptojacking. This is where attackers hijack computer resources to mine cryptocurrency without the owner’s consent. These cryptojacking attacks can significantly degrade system performance, increase electricity costs, and shorten hardware lifespan. With GPU scarcity plaguing organizations, this becomes all the more important to address. Organizations need effective ways to understand and mitigate these threats, which is where emulating cryptomining attacks can help.
In this research, we set out to simulate cryptojacking attacks. For resource-efficiency and security purposes, this was done by creating hashes. With these capabilities, organizations can validate their approach, and test if they are ready to defend themselves from real attacks that can impact their performance and drain their resources, leading to budget issues and overconsumption.
What is Cryptomining and Cryptojacking?
Before discussing our payload and approach, let’s introduce how cryptomining and cryptocurrencies work.
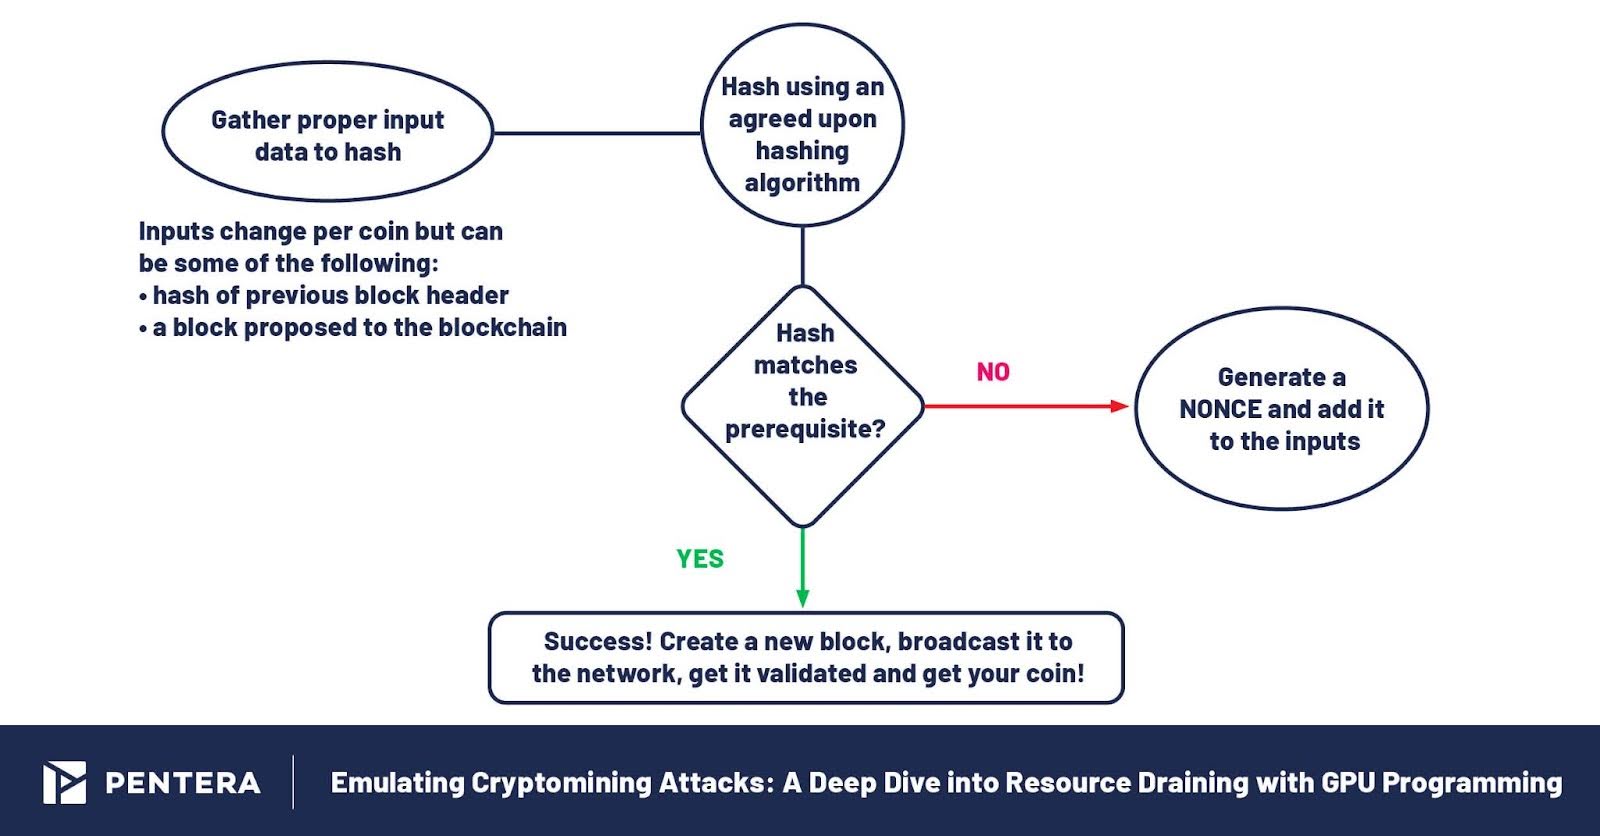
A crypto currency is based upon a set of axioms and constraints agreed upon and adhered to as a prerequisite by all miners, contributors and users. In the case of Bitcoin, for example, it is a Proof of Work, a sha256 hash with a certain number of zeros. Such prerequisites for “owning” virtual currency can vary between the different crypto coins.
Upon transferring any currency, a transaction message is sent across the coin’s blockchain, stating the updated ownership of the currency. That transaction message is then validated by the blockchain’s validators, colloquially known as “miners”. A new block containing a hash, recent transactions, and timestamps is created and saved into the blockchain.
That’s how it works from the market side. In the backend, something needs to trigger the release of new coins into circulation. A cryptominer is the program that utilizes computing power to create hashes that fit the coin’s prerequisite.
We’ve all heard and seen how Bitcoin prices have surged, and how crypto is draining electricity worldwide. Is this all done just to create a bunch of hashes? A prerequisite is a computationally complex mathematical algorithm that requires a lot of calculations to create a unique one-to-one conversion between the input number and the output number. This requires significant computing power, hence the eagerness to exploit other people’s machines.
In modern computers, running such functions once takes less than a millisecond. But when you run a cryptominer, you want to run this conversion as many times as possible, in the shortest amount of time. This lets you receive the most results possible, so you encounter a hash that fits the prerequisite of the crypto coin you’re after.
According to an article by Unblock Talent:
“The crypto mining process involves using a computer to calculate huge ranges of hashes while looking for specific results. For bitcoin, hashes that start with a 0 are able to generate new bitcoins, though this has become harder and harder over time. Thanks to the fact that hashes have to be unique, there are only so many hashes that start with 0. Those that begin with one, two, or three 0s have all been mined a long time ago, with modern hashes requiring a minimum of 18 0s at the start to generate a bitcoin. This is why it has become so much harder to mine these valuable coins; you need a lot more processing power to find a hash with this many zeros.”
Cryptojacking is a form of malicious cryptomining where an organization is infiltrated to exploit its resources and perform cryptomining.
The Importance of GPUs
Cryptomining raises a basic question about performance. Should GPUs or CPUs be used for cryptomining (and cryptojacking)?
Let’s say we’re running on a mid-level CPU. In most cases, the CPU will have approximately 16 logical processors. This means it can theoretically run up to 16 miners simultaneously, generating approximately 3000 hashes a minute.
Running the hash function on a GPU instead of a CPU, produces drastically different results..
GPUs are designed for complexity and large amounts of simple parallel operations, making them significantly more efficient than CPUs for solving multiple tasks quickly. A typical GPU can have thousands of cores compared to the few cores (even if multi-threaded) in a CPU. This allows a GPU to perform thousands of operations simultaneously.
Because of their nature, GPUs can compute hashes much faster than CPUs. While a CPU might provide around 3000 hashes per minute, a GPU could potentially compute millions of hashes in the same time frame, depending on the specific GPU model and the algorithm being used.
Since whoever can solve the tasks the quickest wins it all, organizational GPUs are a significant and lucrative advantage for cryptominers.
The Attack: What We Did
We wanted to replicate a cryptojacking campaign payload and attack flow, while limiting the resources drain and communication to an exterior blockchain.
To do so, we had to dive deeper into GPU programming and the strategic manipulation of CPU and GPU resources.
We developed a modular script that:
- Can run on any environment: Lets you test in different environments and scenarios
- Does not require many prerequisites: Keeps it lightweight for easy implementation, with little to no changes to your environment.
- Can utilize GPU and CPU resources: Provides the ability to test preparedness for cryptojacking campaigns, even if you don’t have any GPUs (as some miners like XMRig rely heavily on CPU)
- Uses simple OS functions to bypass EDRs: Makes it hard for EDRs to detect.
- Only runs for a set amount of time before terminating itself: Validate with minimal costs by limiting use of cloud resources
Our executable, like the cryptominers it simulates, was designed to be “simple”. We didn’t want to involve drivers or kernel space components to make our executable work. Since the executable computes hashes using traditional libraries, there is nothing for the EDR to report about.
Developing the Script
We chose Golang as the script language for its modularity. Golang is widely considered one of the most flexible programming languages due to some of its characteristics:
- Cross-compilation: Go has built-in support for cross-compilation. You can compile a Golang code project for any supported target operating system and architecture from any other supported system. This is facilitated by the GOOS and GOARCH environment variables.
- Single Binary: Go can compile Golang source code into single, statically linked binaries; all dependencies are included in the executable, making it easy to distribute and deploy without worrying about missing libraries.
Using Golang, you can create an executable for any environment upon request. There’s no need to create separate projects, libraries, etc. as all is contained within our Go project.
Next, we wanted to add C code to our Go project to interact with OS functionalities – mainly in the GPU drain (we’ll expand on this in a bit). Go has a helpful feature called CGO, which provides a way to bridge Go and C to enable interoperation between the two languages.
While using CGO, Go cannot statistically link the necessary libraries to run the C code but there is a feature in Go called Tags that create the needed separation between the GPU code and the CPU code.
Tags let you mark different parts of the code, and then request to compile them differently.
We directed the project to compile pages only if a flag for that specific tag appears when we use the Go build command. We can now run different code depending on the system we’re on and the resources it has all from the same project! This enabled us to run and build a single project that suits all machines without encountering compatibility issues with the machine we’re facing.
Computing Power: CPUs and GPUs
Let’s delve deeper into how we worked with the computer’s resources:
Working with the CPU
When creating the executable, it was important to ensure it could use both the CPU and the GPU. While the GPU might be more common, most attacks in the cloud occur on assets that only have CPUs.
Go has valuable features called Goroutines and channels. Instead of handing the authority of thread creation to the OS, Go’s own mechanism can handle threads and threads communication. Our resource draining operation involves using a function that creates Goroutines. The Goroutines are tasked with creating sha256 hashes, while continuously trying to match them to a hard-coded prerequisite until a logical killswitch is activated and all operation stops.
After finding a fitting hash, it is sent through a created channel, which acts as a pipe for all Goroutines to simultaneously dump their hashes in. After the routines stop, we can simply collect all the hashes from the channel.
Working with the GPU
GPU computation is mainly used nowadays for computing complex equations in AI, Data Science and Big Data. When interacting with a GPU, as with any hardware on a system, a toolkit is required. For example, when interacting with the network driver, one needs WinAPI to translate user-space code to kernel-space requests. Similarly, when working with GPUs, one would need a specific toolkit created or supported by the GPU manufacturer. In our case, we have two possible tool kits we can use: the CUDA toolkit, or the OpenCL toolkit.
The two kits exhibit a few differences. CUDA was created specifically for NVIDIA products. It is natively integrated into the ecosystem. OpenCL is an open standard maintained by the Khronos Group that works with all GPU manufacturers.
We chose OpenCL to account for modularity and mobility.
When using the OpenCL Toolkit in Go, we depend on a Go library that uses C code to call out OpenCL functions from OpenCL DLLs. When doing so, you should use CGo.
The GPU lives outside our known context of threads, garbage cleaners and other operations that are handled by the operating system. It is a device that operates on its own context and requires specifically compiled programmes for it.
When writing code for the GPU using the OpenCL toolkit, we need to create an entirely new logical environment from scratch. While the OS takes care of most of the actions when dealing with CPU, GPU requires building and taking care of the variables ourselves.
This program is an example of executing a simple kernel that adds two numbers together.
Let’s go over the steps of creating this program:
- After finding the list of available devices on the machine, we create a logical environment for the GPU device. This logical environment is used for all programming related actions, we create our needed input/output buffers on it, our command queue, and we build and execute our GPU kernel from it.
cl_int ret = clGetPlatformIDs(1, &platformId, &retNumPlatforms);
ret = clGetDeviceIDs(platformId, CL_DEVICE_TYPE_DEFAULT, 1, &deviceId, &retNumDevices);// Create an OpenCL context
cl_context context = clCreateContext(NULL, 1, &deviceId, NULL, NULL, &ret); - We define properties needed for kernel execution inside the context. These include a command queue to be read and executed from and buffers for the arguments the kernel will use.
// Create a command queue
cl_command_queue commandQueue = clCreateCommandQueueWithProperties(context, deviceId, 0, &ret);// Create memory buffers on the device
cl_mem d_a = clCreateBuffer(context, CL_MEM_READ_ONLY | CL_MEM_COPY_HOST_PTR, N * sizeof(int), h_a.data(), &ret);
cl_mem d_b = clCreateBuffer(context, CL_MEM_READ_ONLY | CL_MEM_COPY_HOST_PTR, N * sizeof(int), h_b.data(), &ret);
cl_mem d_c = clCreateBuffer(context, CL_MEM_WRITE_ONLY, N * sizeof(int), NULL, &ret);
- We pass commands to create a fitting program for our kernel, build it and set its arguments to prepare for execution.
// Create a program from the kernel source
cl_program program = clCreateProgramWithSource(context, 1, &kernelSource, NULL, &ret);// Build the program
ret = clBuildProgram(program, 1, &deviceId, NULL, NULL, NULL);// Create the OpenCL kernel
cl_kernel kernel = clCreateKernel(program, "addVectors", &ret);// Set the kernel arguments
ret = clSetKernelArg(kernel, 0, sizeof(cl_mem), (void *)&d_a);
ret = clSetKernelArg(kernel, 1, sizeof(cl_mem), (void *)&d_b);
ret = clSetKernelArg(kernel, 2, sizeof(cl_mem), (void *)&d_c);
- Lastly, we execute the kernel, read from its buffer for the answer, verify our results and clean up after ourselves.
// Execute the OpenCL kernel on the list
size_t globalItemSize = N;
size_t localItemSize = 64;
ret = clEnqueueNDRangeKernel(commandQueue, kernel, 1, NULL, &globalItemSize, &localItemSize, 0, NULL, NULL);// Read the memory buffer d_c on the device to the local variable h_c
ret = clEnqueueReadBuffer(commandQueue, d_c, CL_TRUE, 0, N * sizeof(int), h_c.data(), 0, NULL, NULL);// Verify the result
std::cout << "Computation completed successfully" << std::endl;
// Clean up
clReleaseKernel(kernel);
clReleaseProgram(program);
clReleaseMemObject(d_a);
clReleaseMemObject(d_b);
clReleaseMemObject(d_c);
clReleaseCommandQueue(commandQueue);
clReleaseContext(context);
return 0;
}
And that’s it. We successfully harnessed the power of GPU computation in Go using OpenCL by meticulously setting up a custom environment, managing memory, and executing a kernel to perform high-performance tasks.
Possible Scenarios to Run this Attack
When talking about why modularity and mobility are important to us, we mentioned the ability to run this executable in many different orchestrations. Here are some examples:
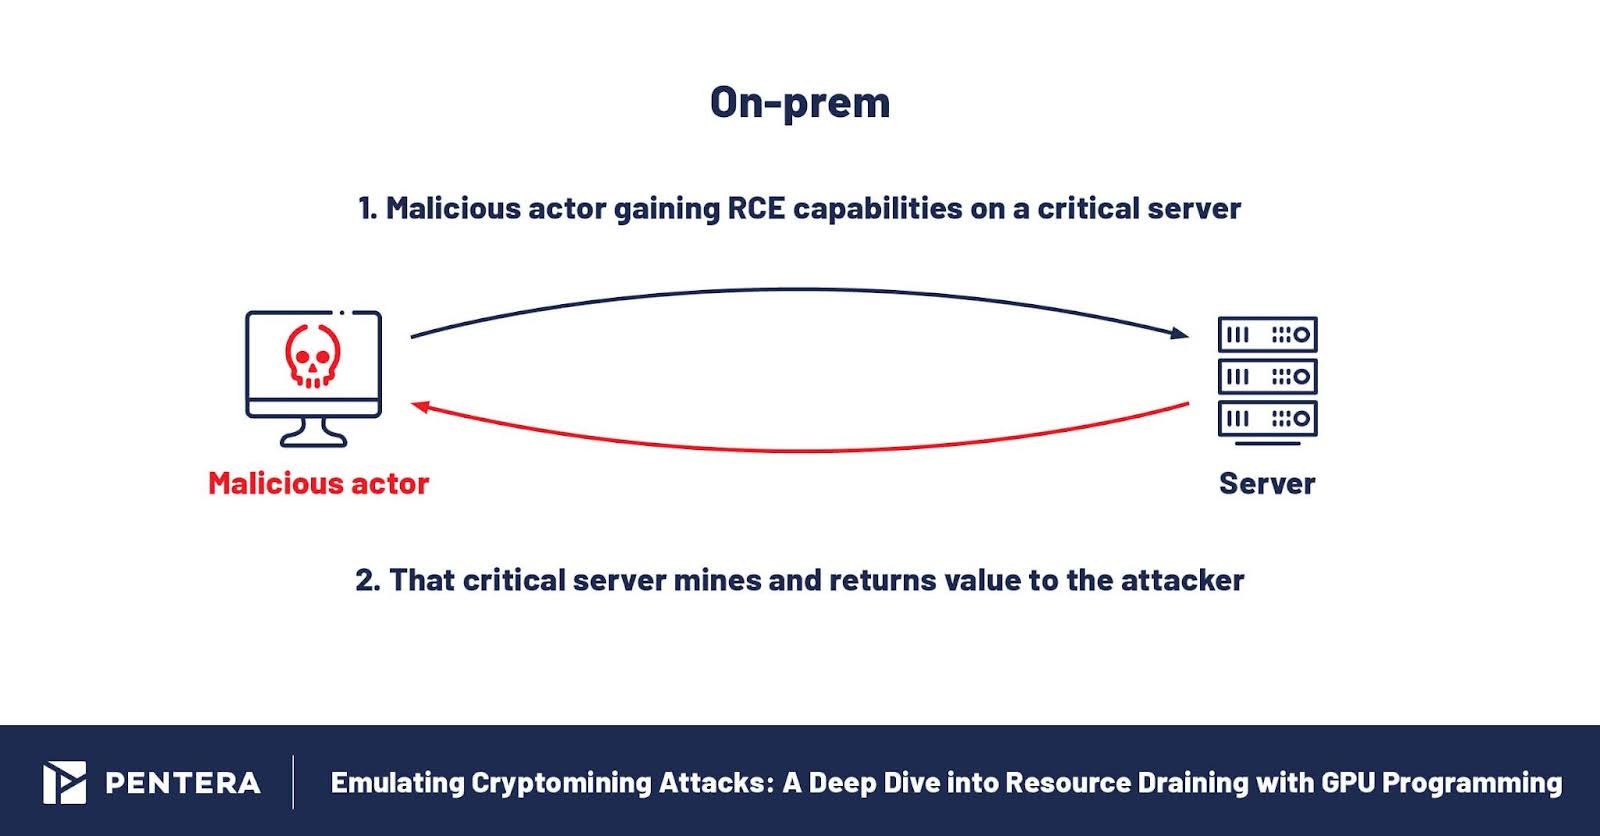
- On-prem environments
The script can be run on any Windows or Linux machine on an on-prem network, including virtual and physical machines. - Kubernetes environments
The script can also be used as a daemon-set to get control of a Kubernetes cluster’s GPU nodes or even as a simple pod inside the cluster. - Cloud environments
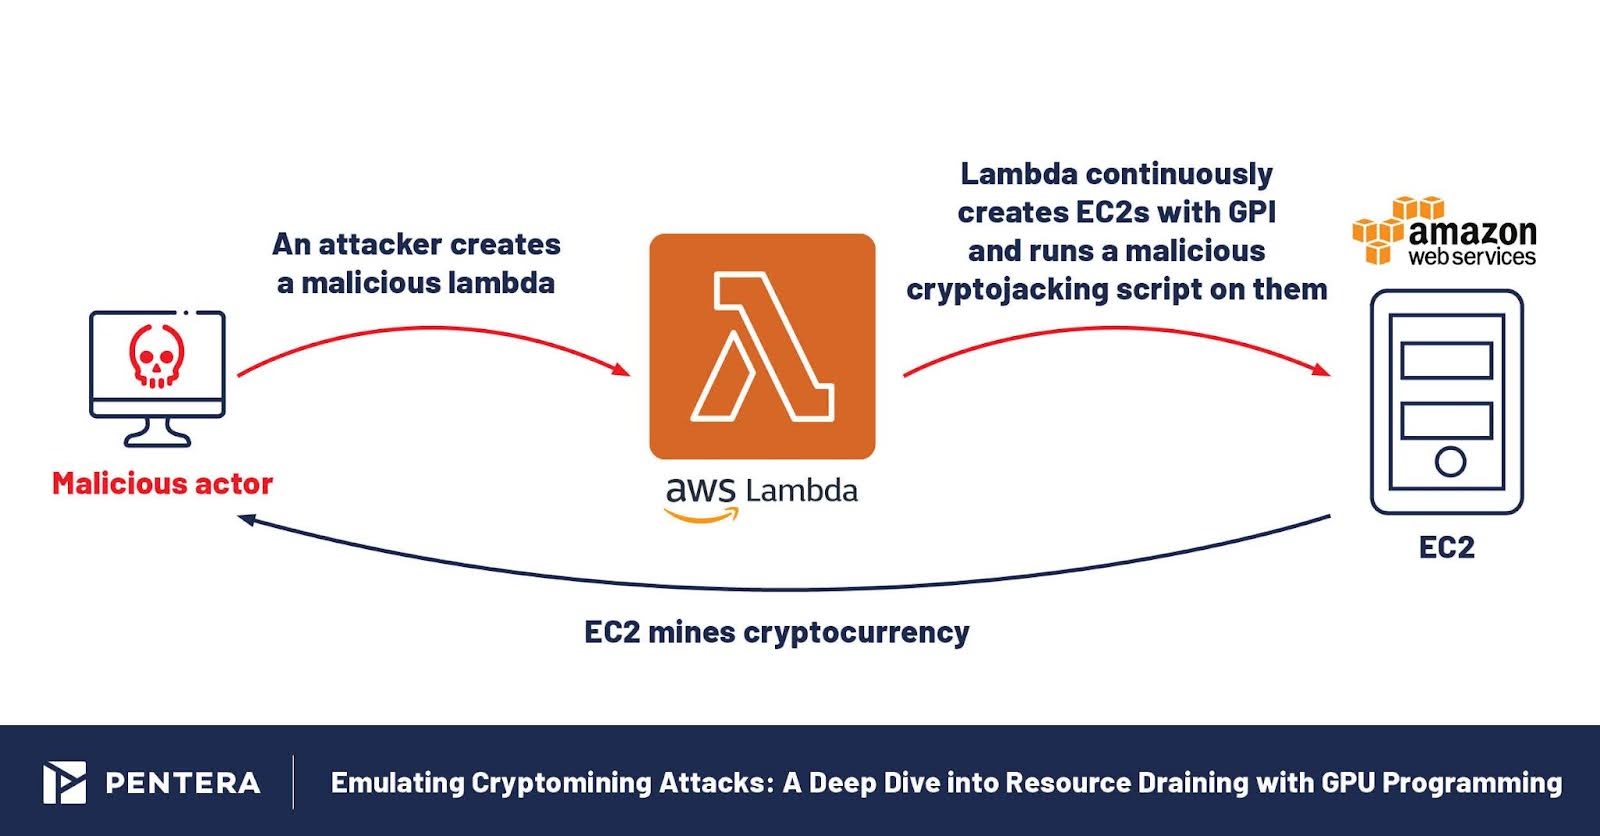
Lastly, the script can also run in cloud environments. Running on cloud environments has become very convenient due to the simplicity in obtaining control over cloud machines. Additionally, as the process of creating and running a malicious cryptomining campaign has become more streamlined and simple to execute, more attackers can deploy these campaigns making them more common.
The Cost of Cryptojacking
According to Sysdig, “On average, to make $8,100, an attacker will need to drive upa $430,000 cloud bill. They make $1 for every $53 their victim is billed.” In short, unlike in other attacks, access to the network is less impactful in a cryptojacking attack, rather it’s the high costs associated with the attacker’s activity.
When creating our simulation, we tried to mimic this behavior without actually costing the user massive amounts of money. That’s why our script works in bursts. The user can gauge whether or not their system monitoring is ready for a cryptojacking attack or not.
This is why testing for cryptomining is critical. It allows IT departments to see how their systems would respond to a real cryptojacking attack. By understanding the specific impacts on CPU and GPU performance, organizations can develop more effective monitoring and mitigation strategies which can fine-time resource allocation and improve overall security posture. Organizations can also identify weak points in their infrastructure and take preemptive measures to reinforce them. This proactive approach not only enhances security but also ensures that legitimate applications receive the resources they need to maintain operational efficiency.
Mitigation: How to Protect Against Cryptomining Attacks
To protect against cryptomining attacks, organizations should implement a multi-layered security strategy. This includes:
- Pentesting: Conduct frequent penetration tests that simulate cryptojacking attacks to detect any vulnerabilities.
- Regular Monitoring: Continuously monitor CPU and GPU usage to detect unusual spikes that may indicate cryptojacking. Take immediate action to investigate and remediate.
- Endpoint Security: Deploy endpoint protection solutions that can identify and block malicious cryptomining software.
- Network Security: Use network monitoring tools to detect suspicious traffic patterns associated with mining operations.
- Software Patches: Keep all software and systems updated to patch vulnerabilities that could be exploited by cryptojackers.
- User Education: Educate employees about the risks of cryptojacking and how to recognize potential signs of an attack.
By simulating cryptomining attacks, organizations can better prepare for and defend against this emerging threat, ensuring their systems remain secure and efficient in the face of evolving cyber challenges.


