Prefer to read the PDF version of this article? Then, click here.
Intro
Network segmentation continues to be touted as a leading best practice among IT practitioners, providing protection against lateral movement, the spread of ransomware and other infections within the organization. Surely, segmentation and even micro-segmentation is recommended. However, as ethical hackers, it is our duty to explore its limitations. Unsurprisingly, segmentation, though useful, certainly has its limitations and they are not minor.
Attack techniques continue to evolve, and as such, common tunneling techniques have been used in real-world attack campaigns to reach areas that were hitherto considered unreachable. For example, ClearSky’s analysis of the Fox Kitten APT Campaign revealed that SSH tunneling was used to expose internal server ports outside the network and access them via RDP.
As ethical hackers, we wouldn’t want to let the adversaries maintain an advantage, so we’ve decided to share more about the benefits of using open-source VPN technology as a means to perform cross-segment lateral movement. In this paper we’ll explain why SoftEther VPN is our tool of choice and walk you through a step-by-step tutorial so you can try it for yourself. We’ll also provide you with key mitigation strategies.
Finally, as a researcher at Pentera Labs, it’s no secret that my research has been implemented into our product to allow you to test your network against VPN tunneling, automatically and autonomously. If you’d like, you can get a free health scan of your organization’s real security risk here.
The goal: lateral movement across network segments
One of the joys of pen-testing is exploring new areas of a network. Whatever the motivation – we are always curious to get the most out of the network and its technology. Nothing will stop us from pulling out our beloved tools and cyber kits and getting down to business: scanning the network, enumerating services, exploiting services and configurations, getting privileged credentials, performing some lateral-movement, and bypassing AVs. Basically, we’ll get busy having some fun.
One of our main challenges is usually easing the process of migrating our tools and cyber kits while interacting with and exploiting new assets. There are certainly many ways to do this, mostly using network capabilities, such as leveraging SSH or VPN features, or installing C2 (Command & Control) agents loaded with weaponized modules or different communication techniques.
And this is where VPN technology comes in as a means for performing cross-segment lateral movement. Our goal in segmentation flattening is to gain access to all of the hosts in another segment without encountering firewall restrictions. This will allow us to fire our cyber hacking tools directly from our machine without requiring Man-In-The-Middle C2 agents or tool migration.
Why SoftEther VPN should be on every pentester’s A-list
I’ve been using SoftEther VPN for several years and can seriously vouch for its merits. I’d go as far as saying it belongs in the arsenal of every pentesting team.
SoftEther VPN is an open-source project that provides cross-platform, multi-protocol VPN capabilities. It runs on Windows, Linux, Mac, FreeBSD and Solaris, and supports OpenVPN, IPsec, and MS-SSTP VPN implementations. Plus, it also has a strong SSL-VPN protocol implementation.
SoftEther VPN has many built-in features that can help bypass network restrictions and firewalls. Other great features it includes are HTTPS-SSL, which makes your VPN tunneling communication appear like legitimate HTTPS traffic, Dynamic DNS and a Nat-Traversal feature which lets you place your VPN server inside the network without requiring you to configure or set up forwarding rules in the firewall or the router device. It even has VPN tunneling features over ICMP and DNS!
In terms of managing the components, SoftEther VPN has a CLI tool and also a nice management user interface, which makes it simple for users to configure all of its components. If you’re really in automation mode, you can even leverage its JSON-RPC API to automate all of your setup and configuration. SoftEther VPN also offers the option to integrate with an LDAP and Radius server, and plenty of optional admin settings to harden the server component. Finally, SoftEther VPN supports both Layer 2 and Layer 3 TCP/IP stack encapsulated inside VPN tunneling which works both over TCP and UDP.
Like I was saying, SoftEther VPN is a pentester’s dream. Moving on to the details.
The nitty-gritty details: SoftEther VPN architecture and components
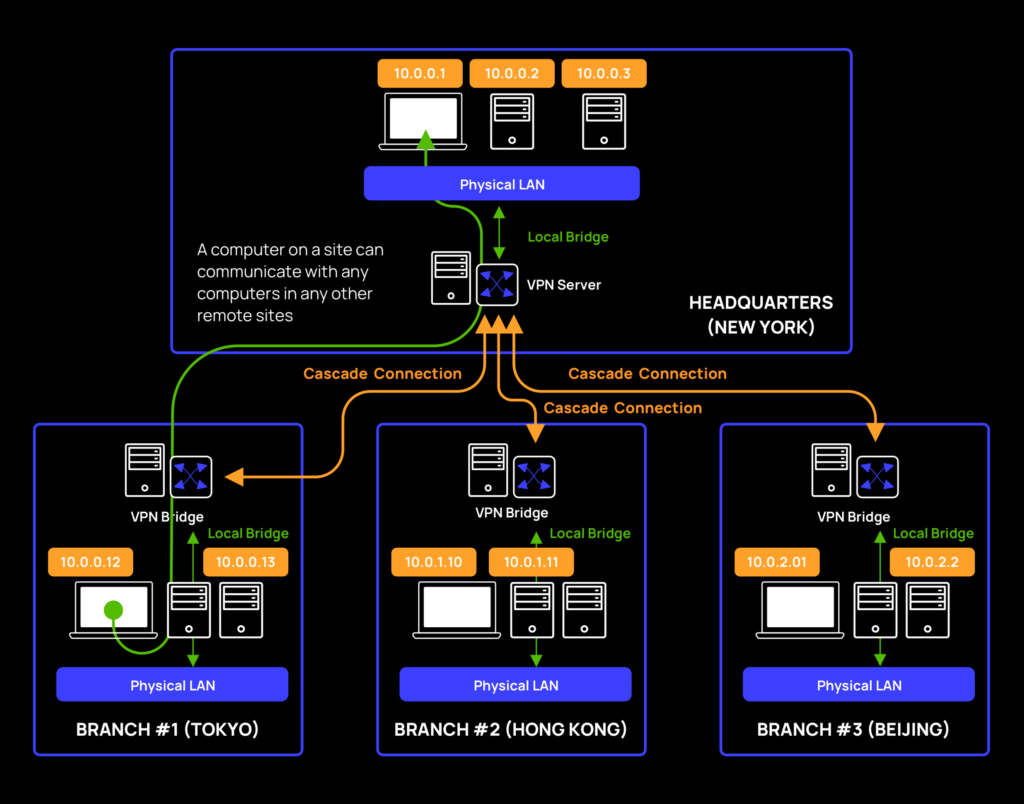
SoftEther has 3 main components, each serving a distinct purpose: the VPN server, client, and bridge.
Server component
SoftEther is armed with various VPN implementations, listening and waiting for the client, and bridge connections. The VPN server can hold and manage multiple components, known as virtual hubs. A virtual hub is basically a virtualized implementation of a switch. Each virtual hub can hold different login types such as local users or domain users authenticated via an LDAP or Radius server.
A virtual hub can be attached or bridged to a local ethernet device, in case you want to bind it to an existing segment from a Layer 2 perspective. Or, from a Layer 3 perspective, it can also act as a NAT with a DHCP server. The virtual hub basically accepts connections from the bridge via a cascade connection, or from the client. Connected components on the same virtual hub can communicate with each other.
Client component
The client component creates managed virtual (TUN/TAP) devices, and connects to a dedicated virtual hub component on top of the VPN server. Basically, you’ll use the client component to connect to a virtual hub, set an IP configuration and you’re good to go.
Bridge component
The bridge component is actually a VPN server with a specific configuration. It has a virtual hub, which on the one hand connects back to a remote VPN server (via a cascade connection), and on the other hand binds into a local ethernet device. It basically gives you the ability to make a “reverse connection“ and share internal network segments out to the outside world. Needless to say, Layer 2 connectivity requires promiscuous mode support.
Diving in
Let’s start with a real-world scenario and consider an example of how SoftEther VPN can be used to achieve segmentation flattening. In our example, the attacker is operating from segment 100 and aims to communicate with Segment 170:
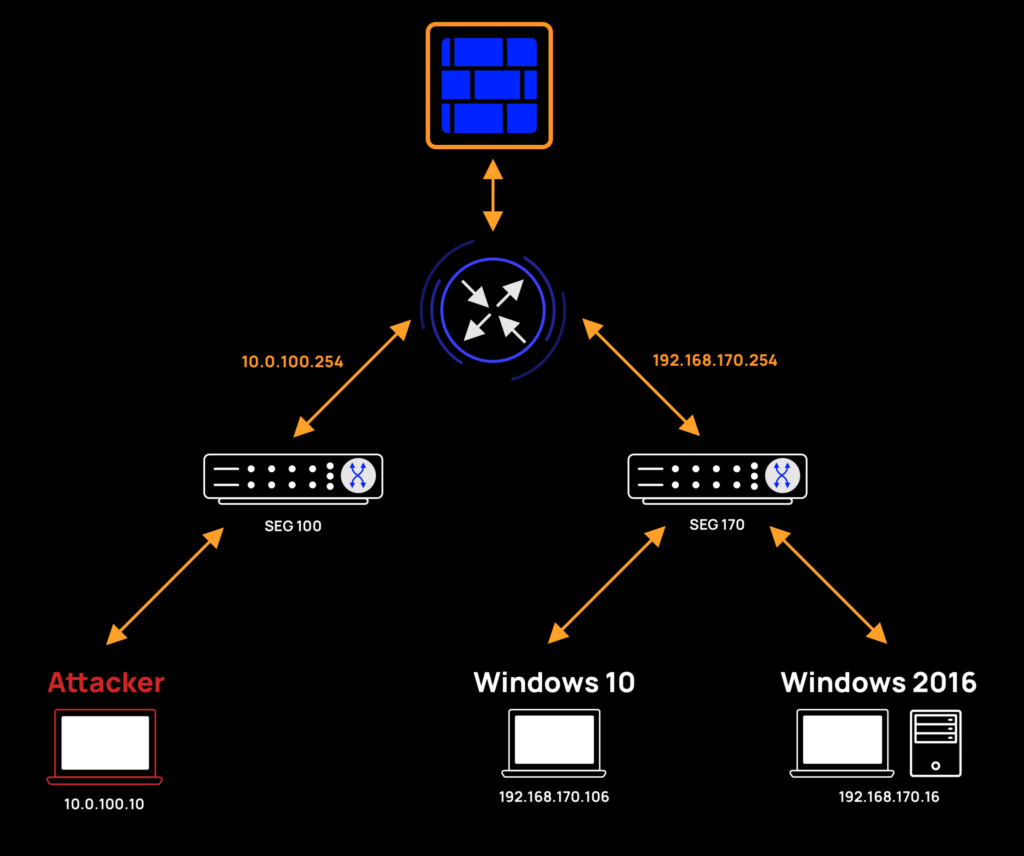
The above network architecture is as follows:
- Segment 100:
- Network: 10.0.100.0/24
- Gateway: 10.0.100.254
- Attacker host: 10.0.100.10
- Segment 170:
- Network: 192.168.170.0/24
- Gateway: 192.168.170.254
- Server Win 2016: 192.168.170.16
- Client Win 10: 192.168.170.106
Scanning the network
Our first step is to use Nmap, the network scanning tool, to find live hosts in segment 170.
We’ll scan using a ping technique to find live hosts. Here are our results:

- As we can see, we only found 1 live host – 192.168.170.106. We are missing 2 hosts – 192.168.170.16 and 192.168.170.254.
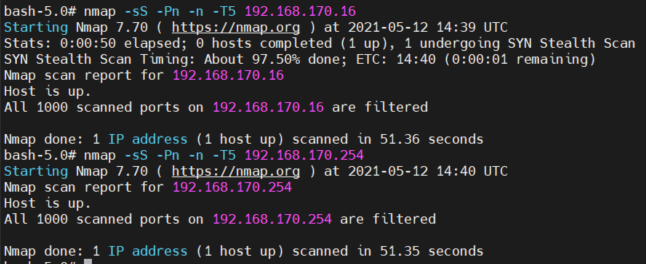
- Next, we’ll try a more aggressive scan just to prove the point that the hosts on segment 170 are not reachable.
In the screenshot below, we specifically targeted 192.168.170.16 and 192.168.170.254, treated them as live hosts and tried to enumerate them by port scanning rather than by pinging them (ICMP ECHO messages). We still couldn’t reach them.
Rolling up our sleeves and setting up SoftEther VPN tools
So far, our scan results showed that the only host we can communicate with in segment 170 is 192.168.170.106. Let’s set up a SoftEther VPN server to listen to HTTPS-SSL VPN on our attack machine. We will create a new virtual hub with 2 local users: One for our local VPN client connection; the other, for a future network bridge connection from host 192.168.170.106.
Now, let’s embrace the Assume Breach approach and assume that host 192.168.170.106 is already compromised. This would mean that an attacker can install SoftEther components on the compromised host. We’ll skip the installation details for the SoftEther components, as they are well-documented in the project itself. The highlights worth noting are that installing SoftEther components requires a privileged user. Also, during installation on Windows clients, Registry keys are added, a signed SoftEther proprietary driver is installed, and a service is created. Finally, there’s an option for the server to run without a service by enabling the “usermode” flag.
Trying it out for ourselves
If you’re in for the ride, you can roll-up your sleeves and give it a go for yourself. Or you can skip ahead to the next section to see the attack opportunities in store once you’ve flattened the network.
Setting up a VPN tunnel to a remote segment
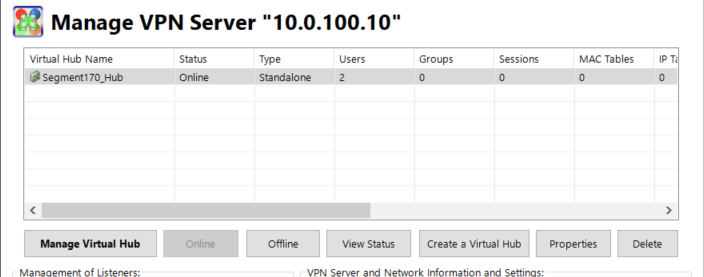
- Create a VPN server with a dedicated virtual hub: “Segment170_Hub“ on top of our Attacker machine:
- Create 2 dedicated users in the virtual hub.

- bridge_user: will be used to connect the bridge to the VPN server via a “cascade connection“.
- pentera_user: will be used to connect the VPN client to the VPN server.
- Create a VPN client on top of our Attacker machine and configure it.
- Disclaimer: For convenience, we set up the VPN client on the same host as the VPN server. We could have placed the VPN client and the VPN server on separate hosts as there’s no requirement to install the VPN client on the same machine as the VPN server.
- Create a dedicated NIC called: seg_170:

- Create an account profile named: conn_170:

Disclaimer: Our VPN server listens on port 443, but we set up a forwarding rule from port 44443 to 443.
Both the VPN client and bridge components will be connected to port 44443.
- Set up an account password:

- Connect the VPN client to the VPN server:
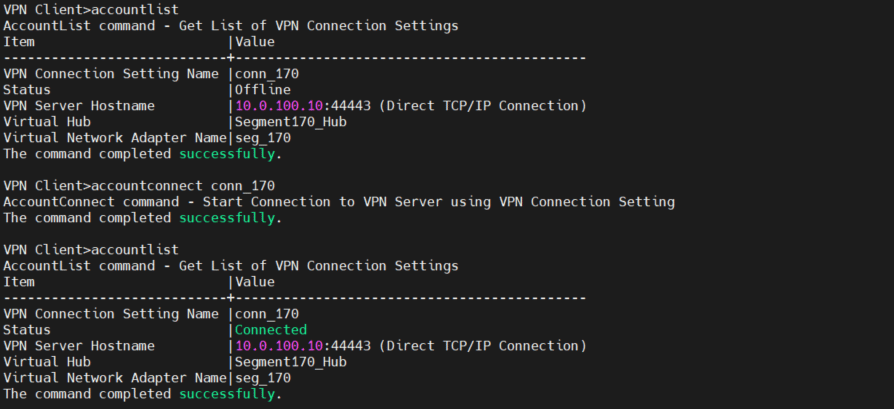
At this point, we have finished setting up a VPN server with a dedicated virtual hub on our Attacker machine. We have also configured a VPN client on our Attacker machine and connected it to the virtual hub.
Creating a Network Bridge
Our next goal is to create a bridge configuration on top of our compromised host in the target segment. In our example, that would be host 192.168.170.106.
- Create a virtual hub called “BRIDGE_HUB“:
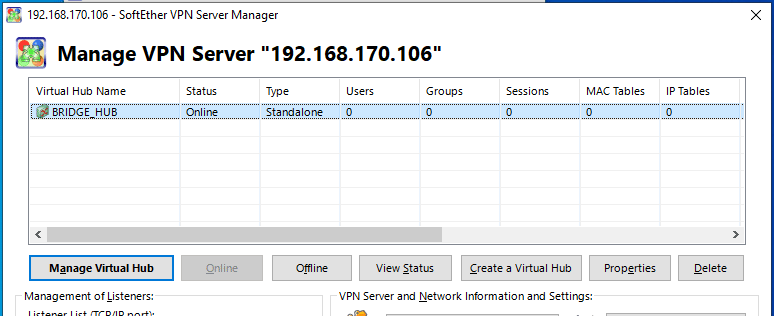
- Bridge “BRIDGE_HUB“ with ethernet device Ethernet0:
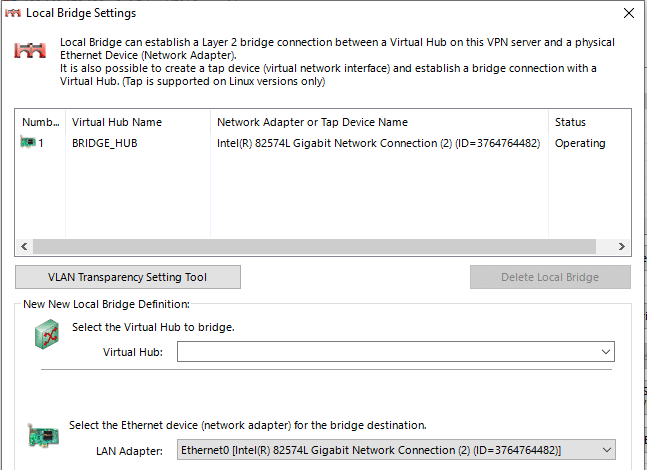
Ethernet0 is the interface with IP 192.168.170.106. It will let us share the whole segment.
Disclaimer: Layer 2 segment bridging requires support for a promiscuous capability from the host’s interface and all the upstream intermediate network devices. When the promiscuous mode has been disabled, we could jump into Layer 3 configuration, but we will not cover this use case here.
- Create a cascade connection:
- Connect the “BRIDGE_HUB” to the VPN server’s “Segment170_HUB” with the dedicated “bridge_user“. In this step, we will “share“ the segment 170 network and expose it to our VPN server and VPN client components.
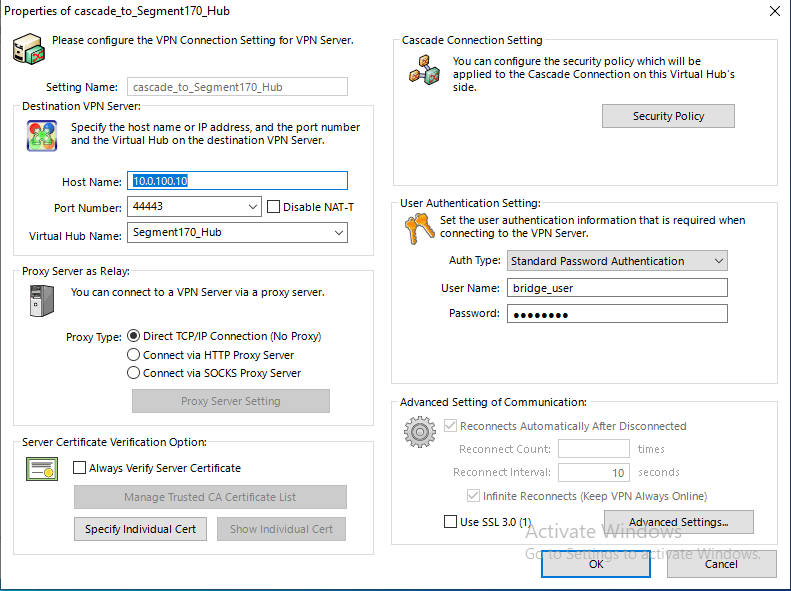
- Establish a cascade connection:

As we can see, we are connected to the Attacker VPN server via HTTPS-SSL VPN implementation on port 44443. In other words, we have established a TCP bi-directional session between 192.168.170.106 and 10.0.100.10:44443.
- Configure the VPN client’s virtual network interface IP:
In our example, we’ll configure a static IP, but using DHCP is also possible if supported by the network.
- Configure a static IP (on segment 170):

- Set up a static route for the compromised host 192.168.170.106:

This route keeps our cascade connection between the bridge and the VPN server through our 10.0.100.254 gateway (TCP bi-directional session between 192.168.170.106 and 10.0.100.10:44443). Otherwise, traffic to destination 192.168.170.0/24 will try to route through our local 192.168.170.10 which will cause our existing TCP session to drop and will disconnect our bridge session.
Mission accomplished: Flattened network architecture
At this point we have finished setting up a VPN tunnel to segment 170 using SoftEther VPN tools. Our architecture is as follows:
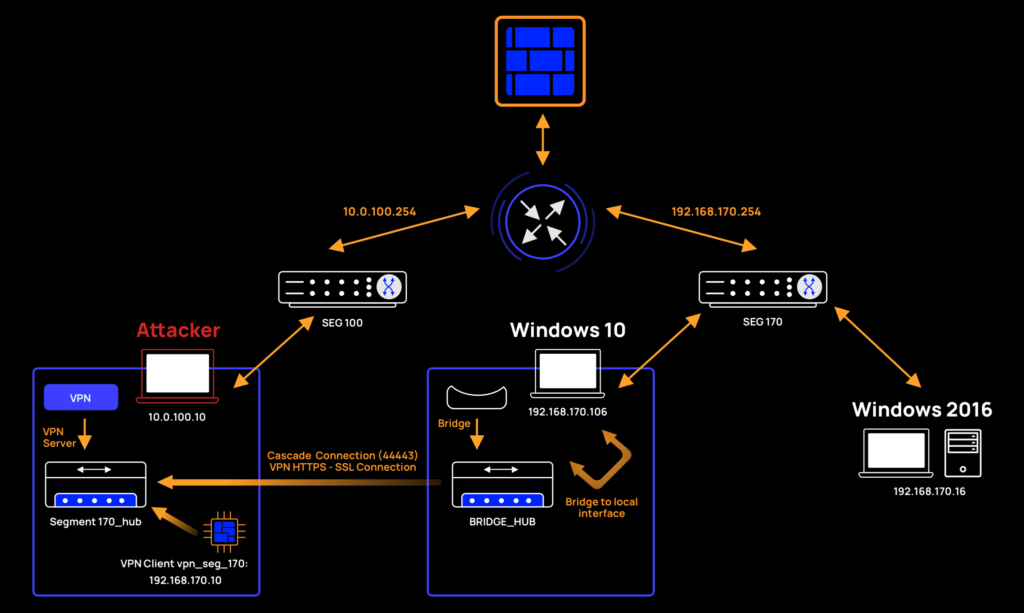
Now every time we try to send packets from our Attacker machine to a host in segment 170, it will route through: vpn_seg_170 NIC → Segment170_Hub → BRIDGE_HUB → Win10 interface → Segment 170 (host). Response routing will be exactly reversed.
Scanning the flattened network
We’re now ready to validate that our segmentation flattening has worked and check whether we were able to bypass the firewall.
Run the following nmap command:

Our results:
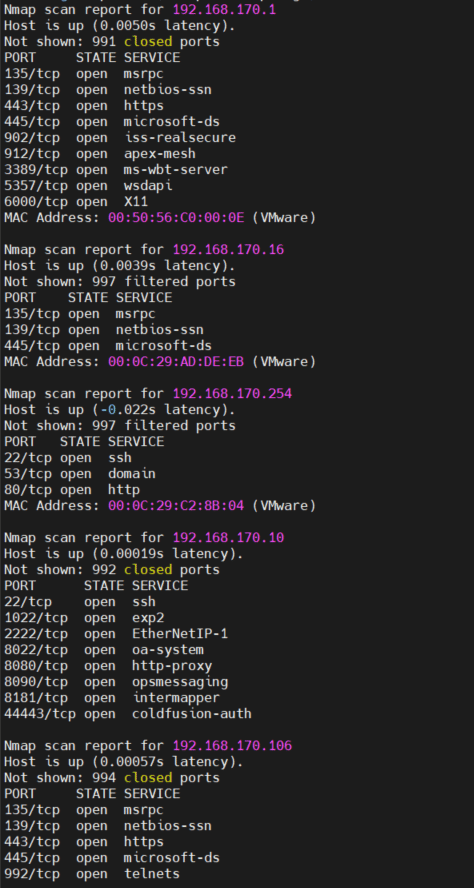
Whoo-hoo! We have confirmed our ability to gain full access to segment 170!
Our segmentation flattening worked and we found 3 new hosts that weren’t exposed before (ignoring our Attacker machine 192.168.170.10 and the previously scanned host: 192.168.170.106).
We are finally in a position to bypass the firewall rules and start to really dig in, enumerate services, exploit them, and abuse network misconfigurations.
Time for Responder! We’re ready to attack over our network bridge
Now that we’ve fully exposed the segment (from a Layer 2 perspective), let’s try to abuse it and capture some misbehavior. Let’s run Responder on our newly-exposed segment.
First, we’ll run a command with the specified VPN client NIC:

After waiting for the user to make a network mistake, we were able to abuse newly revealed hosts and get the following results:

The screenshot above is an example of how we were able to capture the user credentials from host 192.168.170.16. We did this by taking advantage of the vulnerable host when it tried to access a shared network resource. Here’s how it went: First, we grabbed a query from host 192.168.170.16 when it tried to resolve a network resource’s IP address and responded with a malformed response from the IP address of our Attack machine. After poisoning the connection, we led the target host 192.168.170.16 to perform authentication retries to our rouge SMB server. And that’s it. As a result, we were able to capture the user credentials for our target host 192.168.170.16.
To conclude this exercise, using SoftEther VPN, we were able to gain access to a new network with less restrictive firewall rules and expose new hosts. We then ran cyber attacks on the exposed hosts directly from our attacker machine from another network segment and abused compromised network misconfigurations in the same broadcast domain.
Mitigating against VPN Tunneling
Network misconfigurations leveraged by VPN tunneling present risks that must be curtailed. Mitigating steps can and should be taken on both the application and network levels.
At the application level, network admins should aim to prevent the installation of unwanted drivers. Application whitelisting should do the trick.
At the network level, there are several ways to prevent an attacker from using his VPN network interface by blocking the attacker’s MAC address:
- Disabling promiscuous mode at the Operating System level or in intermediate devices such as switches.
- Implementing Network Access Control (NAC) solutions.
- Implementing switch security capabilities, such as Cisco port security.
- In virtual environments, it’s a good idea to disable promiscuous mode and prevent MAC Spoofing.
At the transport level (TCP/UDP), blocking TCP sessions by intercepting SSL communication and analyzing certificate correctness or destination is recommended. This will prevent communication to unwanted servers such as the VPN server itself.
Continuously testing your segmentation with Pentera
In this paper, we showed how attackers can leverage VPN tunneling to expand network access and attack remote hosts directly without needing to migrate their cyber weapons closer to the targets.
As pentesters, we were able to validate that a readily available open-source tool such as SoftEther VPN could be used to set up VPN tunneling to a restricted segment over Layer 2. In our example, setup and configuration were done manually, but they could easily be automated using available APIs and customizations of the source code. Custom pre-configured SoftEther binaries can be used as payloads. All in all, considering we’ve only covered a small portion of SoftEther features, it’s clear that VPN tunneling presents a serious threat from even script-kiddies and cyber hobbyists.
Given the risks involved, continuously pentesting to check for dynamic vulnerabilities and exposures due to network misconfigurations is highly recommended. Pentera is the recommended solution for automated security validation.


